Needlepoint Whipped Backstitch

- It makes great lines. You can stitch a straight line or a curve without using the "steps" that a tent stitch makes when the line goes up and to the left.
- It's quick.
- It' s great for outlining shapes and objects, and drawing attention to elements of your design.
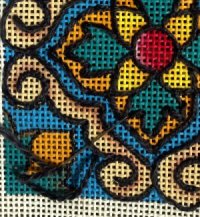
I wanted to use a Whipped Backstitch on this Lisbon Tile because I thought the curling black lines wouldn't look as good if stitched in tent stitch. These lines form a symmetrical pattern, so in a tent stitch when the line goes in the same direction as the stitch it would look like a straight line, but when it leans toward the opposite direction it would look like a stepped line. I wanted the lines to look smooth regardless of their direction.
 |
| The needle is sliding under each backstitch, one after the other, until they have all been "wrapped" or "whipped". |
So I backstitched each line which allowed me to "draw" in all the curves and curls in a smoothly flowing manner, and then I "whipped" this backstitch to give it a thicker and curvier appearance. To whip the stitch all you do is slide the needle under each stitch, wrapping the thread around each consecutive stitch a bit like a snake coiling around a branch. It's so easy.
If you are whipping a curve, slide the needle under the backstitch toward the inside of the curve.
I have finished all the backstitching and all the whipping (see the picture below) and the design is ready for me to decide what to stitch next. The black lines look a little like leadlight which I think really works well for this design.